Symmetry and colouring - 2
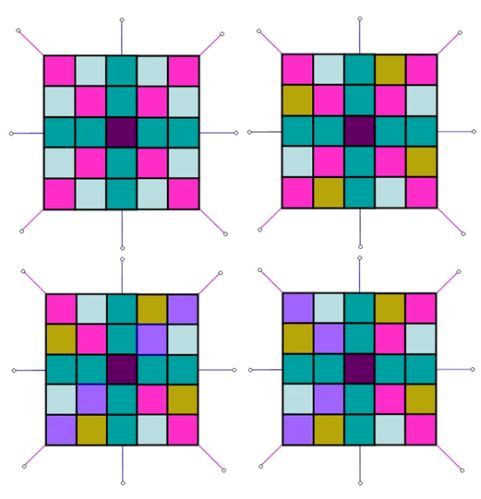
Yesterday, I gave an account of the colouring problems we encounter when creating patterns that can be drawn on a hexagonal grid. Today I am going to deal with the problems we face when colouring basically a square pattern. These are evident in the enclosed picture.
Lesson 1 - Let us first take the picture on the top left. If we start with a central square, we can build around this various square layers. At the centre, there is 1 square. In the first layer surrounding it, there are 8 squares. In the second layer, there are 16 squares, in the third there are 24, in the fourth 32, etc. When drawing patterns in expanding circles, this must be borne in mind and the proper number must be used to keep the symmetry in tact.
Lesson 2 - In the same picture, you will see that the symmetry is four-fold (90 degree rotation). Besides there are four mirrors (two in vertical and horizontal directions) and two in diagonal directions. I coloured the squares in such a way that the symmetries corresponding to both the 90 degree rotations and all possible mirror symmetries are obeyed. This is the highest symmetry possible for this type of rotation in the plane.
Lesson 3 - Consider the picture on the top right. I coloured this pattern in such a way that only 90 degree rotations are present here, but no mirror symmetries. If you ignore the colours, this too has the same symmetry like the previous one. But with colours the symmetry is reduced to only rotations.
Lesson 4 - Consider the picture on the bottom left. Here I have coloured it in such a way that not even 90 degree rotations are present. Now the rotational symmetry is only two-fold (180 degree rotation). Even though the symmetry on the grey scale is still the same, the colours I chose reduced it considerably.
Lesson 5 - Consider the picture on the bottom right. The whole picture is square. In this one, there are no 90 degree or 180 degree rotaional symmetries nor any mirror symmetries. There may be regions where locally there may be some symmetry. But for the whole picture there is no symmetry at all. It is this type of mistakes that people commit very often in their rangOlis.
So Both these sets of lessons show that one has to spend some time in planning proper colours in proper places to make the rangOlis look appealing and pleasing.
Regards! - mOhana
P.S. - It looks as if some of you consider my blogs boring and make you yawn (-:), as I find very little response. Any way, I consider it a duty in sharing with others what little I know as I feel this is important. Even if a few derive some benefit, my labours (yes, it takes considerable time and energy to plan and write these) will not go in vain. By the way, I will be very busy the next few days and so I will not be able to comment on many of your artistic creations. - m


Comments
Lata
Thu, 2010-02-18 15:43
Permalink
Nice to have a series of lessons on symmetry and coloring.
I'll be adding another response later on. It was considerate and thoughtful of you to let us all know that you'll be busy.
judelined
Sat, 2010-02-20 01:26
Permalink
JKM you are very thoughtful and I like the way you share your experience with us - keep rocking , there are many followers (though silent at times) so JUST DO IT!!
anantharajam
Mon, 2010-02-22 00:55
Permalink
Thank you so much for this "symmetry tutorial" sir
Ananthalakshmy
anirudh
Mon, 2010-02-22 04:03
Permalink
thanks soo much mOhanaji, cool tutorials on the symmetry...waiting for more.
preetiN
Mon, 2010-03-01 10:56
Permalink
These lessons are very informative. Thanks for taking time to share these with everyone.
Naviprem
Sun, 2010-03-14 21:53
Permalink
Thank you sir, i am going to read this very time before choosing colors for a kolam.