Hexagonal paDikOlam - 10 - How I created it?
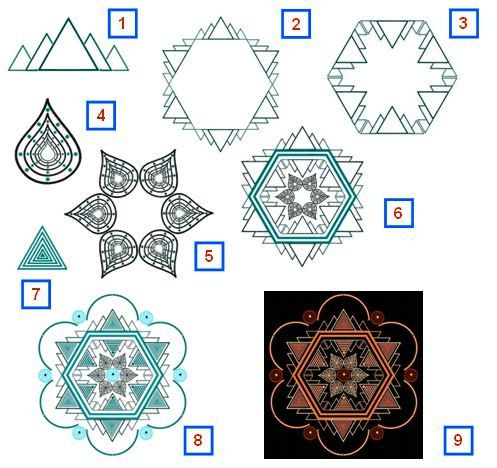
For those who are interested, I am just giving an example of how I did the recently displayed paDikOlam (made on 20 Feb 2010). The accompanying picture will guide you. I have skipped some of the intermediate steps. Fig. 1 shows the symmetrical hilly pattern I created. This was rotated by 60, 120, 180, 240, 300 degrees and assembled on the outside of a hexagon as shown in Fig. 2. The same assembly is done inside of a hexagon in Fig. 3. Fig. 4 is a tear drop with dots etc. constructed separately beforehand. A hexagonal assembly of this is shown in Fig. 5. Figures 2, 3 and 5 are properly placed in a double hexagon as shown in Fig. 6. Fig. 7 is a series of triangles. These are placed in the hollows of Fig. 7 and a border of semicircles with lamps between them surround the pattern. This is the grand design as shown in Fig. 8. A negative of this is taken to get red and white colours of the paDikOlam and slight photographic touches are given to this to finally obtain Fig. 9 which has been displayed today. The softwares used are: MS Powerpoint, Irfanview and MS Office Picture Manager.
Original paDikOlam - http://www.ikolam.com/node/11700
Regards! - mOhana
Comments
pavan kashyap
Thu, 2010-03-25 17:39
Permalink
This is very helpful, Uncle thank you so much ..shortly i am going to try like these kolams...
kameswari
Fri, 2010-03-26 00:12
Permalink
The information is very useful and we can also try this type of kolams. Thanks a lot Sir!
brindhanagesh
Fri, 2010-03-26 01:42
Permalink
I can only enjoy your creations Mohanaji. You are taking lot of effort to guide and encourage ikolam members. I know every type of kolam has its own beauty and and i don't want to spoil that by trying these type of kolams. Hats off to your interest
rajamma_2
Fri, 2010-03-26 06:39
Permalink
mOhanaji, your step by step information to draw this type of kolams in computer is very clear. Due to my eye problem I am restricted in using the computer for long hours. So Let me only enjoy your design rather trying it myself. But I want to know approximately how much time u spend to create this one?
rajamma
anirudh
Fri, 2010-03-26 11:05
Permalink
this is a great tutorial mOhanaji....very good pictorial explainations....thank you soooo much.
jayamohan
Sat, 2010-03-27 23:10
Permalink
Sir your step by step demo. combined with Judy's photoshop demo at todays Chennai Meet throw some light on how you people create such wonders and how much pain you take to do this! Thanks a lot!
jkmrao
Sun, 2010-03-28 17:23
Permalink
Thanks for all the feedback. rAjammAjI, this particular design took about three hours, not continuously, but in three time slots. Some of my postings are in response to some reader's specific queries, even though the information will be useful to everyone. The replies do take some time and effort to prepare. It would be satisfying if the particular reader for whom the response was made acknowledges it. Otherwise, I will be wondering whether the particular person had read it or not or somehow it escaped her / his attention.
Regards! - mOhana
sudhabalakrishnan
Sun, 2010-03-28 21:11
Permalink
Wonderful pictorial and step by step description of the padikolam. It is very useful for all of us. After seeing all these steps i am very excited to create like this. let me try it. Thanks once again for the detailed description of the kolam.